
I have a server with Fedora Core 3 on it. I decided I wanted to set it up with a webcam for viewing my birdfeeder. I had an old IBM webcam that I hooked up. It popped right up on the USB port. SO the real question is how to pull the data.
I found a spiffy app from Intel referenced here.
Sure enough, it compiled on my machine. It wouldn't work with any format but ppm though, so I pulled down a copy of ImageMagick for Fedora Core 3 (as an rpm), installed it, and then added my own little 'snap' script wrapper:
/usr/local/bin/vidcat -f ppm -o /tmp/test.ppm
/usr/bin/convert /tmp/test.ppm /tmp/test.jpg
cp /tmp/test.jpg /var/www/html/pics/
I added this to my crontab, and voila, an automagically updating webcam.
Tuesday, December 12, 2006
Sunday, November 19, 2006
The Next Big Project
To date, things have been a bit limited in scope, because, well, an apartment only allows for so much hacking. However, within the next month or so, I am relocating the family to a house with attached garage, giving me more room for hardware and software hacking. Some topics I expect to add as I work my way through a list of projects for the new house:
- Solar powered lighting
- Security systems
- Home Automation
- Professional looking shelves made simple
- USB LCDs for Server Monitoring
- LED Lighting for Keyboards and Deskspaces
- Lots of other electronic, construction, software, hardware, and 'green 'projects...
Monday, October 02, 2006
SOme Software to Play with
It is interesting the amount of free software that is out there that a person never hears of. Along those lines, here are a couple of my favs:
Process Explorer
WPMTray
More to come...
Process Explorer
WPMTray
More to come...
Thursday, September 28, 2006
NWN Remote Administered Server
I am a big D&D fan, always have been. For 15+ years I have played D&D and other RPGs, including a few I wrote myself, both with pen and paper, and a couple that I coded up myself in BASIC on my old C64. I have been playing Neverwinter Nights (NWN) since it came out. I find it an awesome games, combining an awesome player experience with nonlinear game worlds. It can be run standalone or as a client connected to public or private server. There is a toolkit that comes with it that allows DMs to build their own worlds. You can even host them on a server and connect up as the DM with godlike powers to run a game almost in the old pen and paper sortof way.
With Neverwinter Nights 2 coming out on October 17, the cost of the original NWN stuff is dropping quickly. I was able to pick up a copy of the full version (with both add-on packs Shadows of Undrentide (SoU) and Hordes of the Underdark (HotU)) for a mere $20 on Walmart.com. I thought now is the perfect time to bring a server online for playing.
I downloaded the NWN server from here.
Installation was pretty straightforward. I installed per the directions from here. In my case, I avoided copying my whole hak directory over, since it is huge. Likewise I avoided copying all of my modules (game modules) over, because I have a lot of them, Instead I chose to install a persistent world module. Persistent worlds are meant to be continuously running server games that people can play over and over without have to restart the module.
The Rhun modules can be found here. The server can be started from the command line to load a module automatically. However, this is a pain, since one must login to the linux server of interest.
To fix this, I downloaded NWN Administration. It is a PHP-based web-based administration tool. It can be found here.
Friday, September 15, 2006
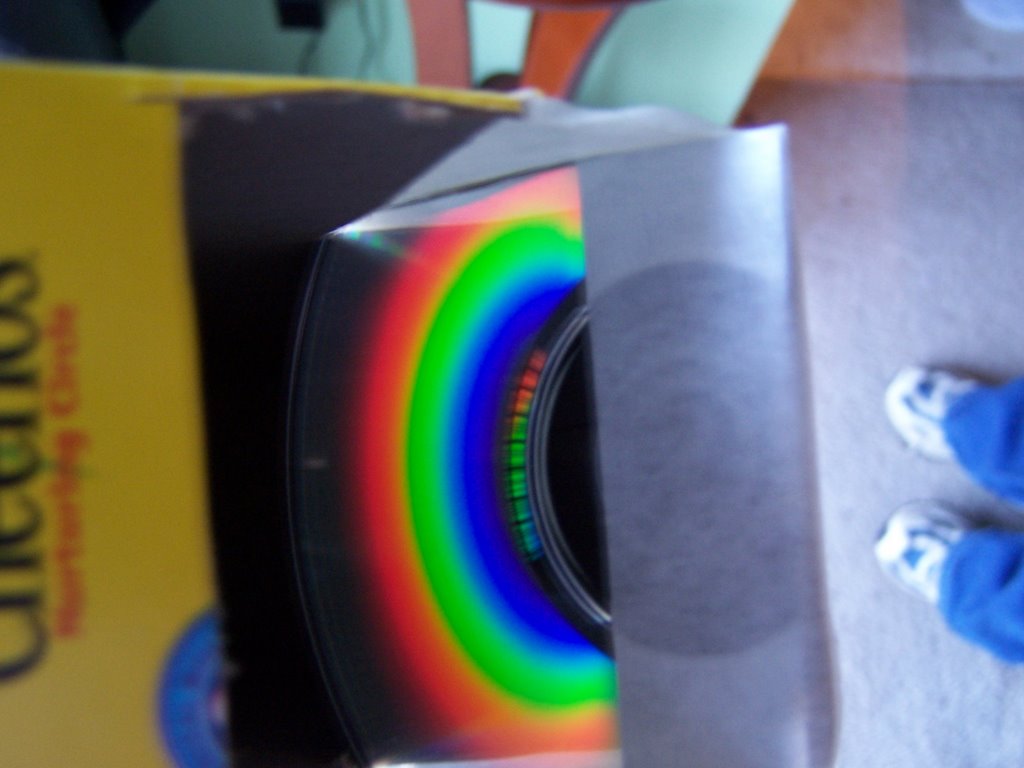
CD Cereal Box Spectrometer
I built one of these.
Very cool.
My Cheerio box version:

A look at the CD mount.

A fluorescent bulb spectrum...

A solar spectrum

Very cool.
My Cheerio box version:

A look at the CD mount.

A fluorescent bulb spectrum...

A solar spectrum
Wednesday, September 13, 2006
PHP MySQL Shopping List
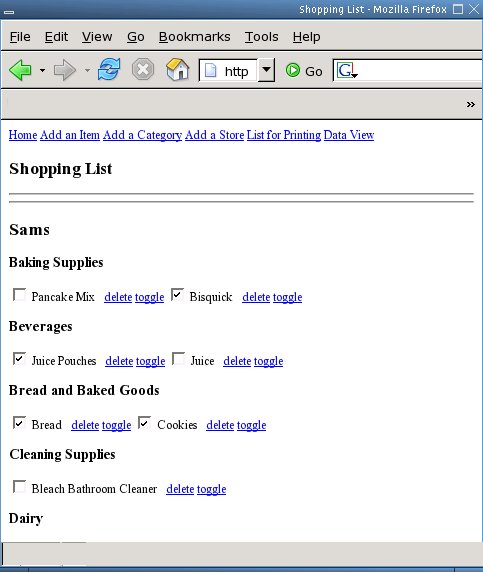
I have a real problem with forgetting to put things on the shopping list. What I need is a template to work from.
I also have problems with misplacing my peice of paper with the list on it... it is in the other room or in the car or who knows where.
I also have a problem with organizing the list so I don't have to zig zag around the store because I forget to grab things as I go.
The above screen shot is a simple php - mysql web-based shopping list. I built it over a period of a few hours based on tutorials I found on the web, like this. At some point, I'll throw the source code out so everyone can take a look. All the database configuration was done from command line using mysql tutorials available on the web.
Sunday, September 10, 2006
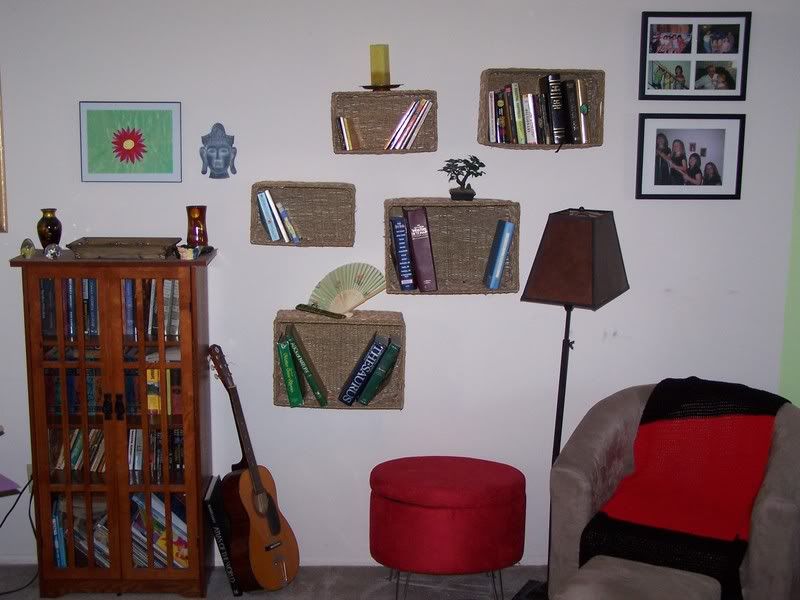
A Stylish Bookcase
If there are two things I like to mix together, it is cheap and stylish. In this case, a trip to Big Lots produced a stack of metal framed baskets. By using drywall screws to attach them to the wall, I was able to add a stylish new bookcase to the living room. Note that because you can arrange them however you want, you can work around existing furniture. You also get bonus shelves on tops of them for accessories. Spiffy, eh?
Saturday, September 09, 2006
TVOut on a Compaq Armada 1750 ATI 3D Rage LT Pro under Linux
I have a Compaq Armada 1750 laptop with an ATI 3D Rage LT Pro video card. I rune SuSE 10.0 on it, keeping it light with some custom configuration and blackbox for a window manager. Recently I really wanted to get the TV out working on it, so I can hook it up to the TV in the living room.
As a note, SuSE 10.0 on my laptop was running Xorg 6.8.2.
I searched and searched through lots of recipes for gettng atitvout to work. It turned out easier than can be. Here are the steps I used:
As a note, SuSE 10.0 on my laptop was running Xorg 6.8.2.
I searched and searched through lots of recipes for gettng atitvout to work. It turned out easier than can be. Here are the steps I used:
- Download and install atitvout-0.4-194.i586.rpm.
- Reconfigure xorg.conf to use the vesa driver. You cannot use the ati or other drivers. Also, I recommend making sure you can support 1024x768 and 800x600 in your configuration.
- Reboot with the vesa driver and configuration in place.
- As root,
atitvout ntsc
atitvout -f lt
Thursday, September 07, 2006
Turning a Junk Comp into a Lean, Mean, Usable Machine using Damn Small Linux
Much to my dismay, I had a couple of machine failures which left me with a need to build some useful comps for my girls out of some of my more seasoned hardware. In this case, I am going to discuss how I built a kid-friendly internet-ready computer out of an old P2 266MHz Gateway with 196MB RAM.
Damn Small Linux has come a long way through its releases. The latest version, though still built on a 2.4 kernel, is just plain sweet. The 50MB Live Disk gives you a good tour of its basic features. It is very fast if you run it in RAM. Adding myDSL extensions gives the user the option of even loading optional packages. In this area you'll find cool stuff like games, Firefox 1.5, OpenOffice, ABIWord, etc. But, I don't want to have my girls run from a Live Disk all of the time. They like being able to save and reconfigure stuff. And, quite frankly, I don't want to have to leave one of my more modern CDROMs stuck in their machine.
Luckily DSL supports a couple of different install options for putting in on the harddrive. I chose to do the 50MB install (which runs in RAM) and extend it using myDSL.
Here's the rough outline of what I did (not including various reboots for testing components as I configured them):
- Get a 50MB DSL CD burnt and verify that it booted in the machine and that the base Live CD worked fine.
- Fired up fdisk (or you could use cfdisk or gparted or you other favorite) and set up my harddisk partitions:
/dev/hda1 50MB ext2
/dev/hda2 1024MB linux swap
/dev/hda3 Remaining ext2 - I also used mkfs to put on filesystems:
mkfs -t ext2 /dev/hda1
mkfs -t ext2 /dev/hda3 - I then booted up DSL and used "Apps->Tools->Install to Hard Drive" from the menu to install the OS. I chose to use grub, since it seems to have better features than LILO.
- Using download through the bulti-in myDSL browser, I added a bunch of myDSL packages to /mnt/hda3:
XFree86.dsl
jre1_5_0.uci
aumix.dsl
samba.dsl
codecpak.dsl
xcalc.dsl
dosbox.dsl
xine.dsl
firefox-1.5.0.6.uci
xpdf-3.01pl2.uci
gtk2-0705.dsl - I added more packages that I only want to use sometimes. The "sometimes" class got moved into /mnt/hda3/optional folder. This is an important step if you have limited RAM like I did. Packages in this folder only get loaded from the menu by the user. In this case, for my daughters, I installed a lot of games. Here are my optional packages:
Ultima-AOD.tar.gz
opera9.uci
Ultima-AOE.tar.gz
toppler.dsl
Ultima-AOE.tar.gz.md5.txt
abiword.dsl
tuxtype.dsl
billard-gl.dsl
xasteroids.tar.gz
bittorrent-cli.dsl
xboing.dsl
bittorrent-gui.dsl
xbubble.tar.gz
bugsquish.dsl
xf86config.dsl
circuslinux.dsl
xgalaga.dsl
eboard.dsl
xgammon.dsl
freeciv.dsl
xmahjongg.tar.gz
gcompris2.dsl
xmame.dsl
gimp-1.2.dsl
xpat2.dsl
mathwar.dsl
xpuyopuyo.dsl - Edit the boot sequence in /cdrom/boot/grub/menu.1st, as given below. The host= sets the hostname. The restore= sets up restoration of settings. The mydsl= sets up the pointer to the mydsl packages. Don't let the name fool you -- /cdrom is actually the cd image that you installed in step 4.
title DSL
kernel /boot/linux24 root=/dev/hda1 quiet vga=normal nodhcp acpi apm dma noscsi host=matador restore=hda3 mydsl=hda3 frugal
initrd /boot/minirt24.gz - I setup XFree86 to get a little better graphic performance. Install the xf86config package and run xf86config. I saved the output file to /home/dsl/.xfree86/XF86Config-4.
- Edit /home/dsl/.xserverrc to move from Xvesa to XFree86, leaving the line for XVesa in case I need it:
# XVesa Config
#exec /usr/bin/X11/Xvesa -mouse /dev/psaux,5 -screen 1024x768x16 -shadow -nolisten tcp -I &>/dev/null
# XFree86 Config
exec sudo /usr/X11R6/bin/XFree86 -nolisten tcp -xf86config ~/.xfree86/XF86Config-4 - Edit the .xinitrc to set up lots of things. Here is my edited version with some notes.
# put X windows programs that you want started here.
# Be sure to add at the end of each command the &
KEYTABLE="$(getknoppixparam.lua KEYTABLE)"
DESKTOP="$(getoption.lua $HOME/.desktop wm)"
ICONS="$(getoption.lua $HOME/.desktop icons)"
# For non-US Keyboards
if [ ${KEYTABLE:0:2} != "us" ]; then
xmodmap -e "clear Mod4" -e "add Mod5 = Mode_switch" &
fi
#if egrep -qv noicons /proc/cmdline 2>/dev/null; then
if [ "$ICONS" == 1 ]; then
for x in `ls -1 .xtdesktop/*.hide 2>/dev/null`; do rm -f ${x%.*}; done
iconsnap.lua &>/dev/null &
xtdesk.sh
fi
Here I got rid of the default startup help:
#eliminate startup help
#dillo /usr/share/doc/dsl/getting_started.html &>/dev/null &
Here I mounted my raid:
#Mount the Raid
sudo mkdir /mnt/raid &> /dev/null &
sudo /usr/bin/smbmount //ROGUE/raid /mnt/raid/ -o guest &>/dev/null &
I started gtk2 by default
#Start GTK2
/usr/bin/start_gtk2 &> /dev/null &
I use aumix to automatically set the sound volumes to what I wanted
#Fix sound volumes
aumix -w 100 &> /dev/null &
aumix -v 100 &> /dev/null &
#Desktop Info
torsmo 2>/dev/null &
case $DESKTOP in
fluxbox )
Here I got rid of some of the default apps I didn't need:
#Get rid of pager
#fluxter &>/dev/null &
#Get rid of the dock crap
#wmswallow -geometry 70x80 docked docked.lua &
exec fluxbox 2>/dev/null
;;
jwm )
./.background
sleep 2
exec jwm 2>/dev/null
;;
* )
exec fluxbox 2>/dev/null
;;
esac
- Firefox 1.5 with jre and default installed Flash for games
- Ability to play Mp3 and other audio files with XMMS
- Ability to mount shared network drives with Samba
- Ability to play videos with Xine (on this machine at %50 size over a samba mount)
- Ability to view and edit images
- Lots of games
- Word Processor, Spreadsheet, Calculator
- Ability to add other applications easily if I need them.
Configuring a Whitelist Proxy for Kid-safe Internet Access
I want my children to have access to the internet, but I also know there is a lot of stuff out there I don't want them to have access to. For me, I only want to let them visit web sites that I have reviewed and approved for their consumption. This list, known as a whitelist, is something I want to be able to easily control, update, and adapt for use over time, and I want to be able to have them use it from any of multiple computers.
This article offered a good start to getting a squid server up and running to do just this. As an added bonus, this is a caching server, so once they load things once they can access them quickly from server cache. I had a headstart on the process since I already had a box running Fedora Core 3, and it already had squid rpm installed, but not configured or activated. Let me summarize exactly what I did to get squid configured.
This article offered a good start to getting a squid server up and running to do just this. As an added bonus, this is a caching server, so once they load things once they can access them quickly from server cache. I had a headstart on the process since I already had a box running Fedora Core 3, and it already had squid rpm installed, but not configured or activated. Let me summarize exactly what I did to get squid configured.
- Installed squid (already done) via rpm (rpm -Uvh packagename) on Fedora Core 3.
- Edit /full/path/squid.conf starting with the default configuration file. My changes / additions are marked below:
#CHANGE: Use a more standard proxy port
http_port 8080
#CHANGE: Set my cache directory onto my local raid
cache_dir ufs /raid/squid 100 16 256
#CHANGE: Set the ftp user as my email address
#(not included here)
ftp_user myemail@myaddress.com
#ADD: Setup the authentication as ncsa through
# the files we will set up in the next step
auth_param basic program /usr/lib/squid/ncsa_auth /etc/squid/squid_passwd
#CHANGE: Set up visible hostname since squid seemed to need it
visible_hostname mycomputer.someplace.net - Create a "squid_passwd" ncsa auth file:
htpasswd -c /etc/squid/squid_passwd adult
htpasswd /etc/squid/squid_passwd kid - Create a whitelist file /full/path/squid/whitelist. It is simply a flat file with one host/domain or domain per list. I started with a simple one:
.nick.com - Edit /full/path/suid.conf to use these files:
In the acl area of the squid.conf file create these entries:
acl ncsa_adult_users proxy_auth adult
acl ncsa_kid_users proxy_auth kid
acl whitelist dstdomain "/etc/squid/whitelist"
Then in the http_access area of the squid.conf file create these entries:
http_access allow ncsa_adult_users
http_access allow ncsa_kid_users whitelist
http_access deny all - Activate squid by adding it to the boot process and then starting it.
chkconfig squid on
/etc/init.d/squid start - Configure my test browser to use hostname:8080 as its proxy for all protocols. When trying to get to a website, it now asks for a username /password. If you enter the kid password, all non-whitelisted sites should be block. If the adult password is entered, you have full access.
- To ensure that there is no way around the proxy, I block access to the internet from all machines but the proxy machine, or atleast all machines that I want on the proxy. This avoids the kids from just bypassing the proxy.
Printing to a Next Laser Printer from WIndows via Samba
Yes, it can be done. Yes, under NeXTStep 3.3. Yes, from Windows XP. Yes, without any fancy authentication server running.
NextStations and NextCubes (aka. black hardware) were build by NeXT ( a Steve Jobs undertaking) through 1993. These workstations were the "Cadillac" of computers in their time. Their OS, NeXTStep, eventually became the basis for OS X.
One of the nice features of these computers was the NeXT Laser Printer. The 400 DPI black and white monster I got with mine ran for 5 years without changing the toner cartridge. At my college, my colleagues and I would print out hundreds and thousands of pages out on them without so much as a glitch. I like them so much, that when I bought my NeXTStation turbo back in '93, I got the laser printer too.
Now I have Windows and Linux boxes around and a small network, and I want to resurect my old beast and see if I can use its printer with it as a print server. I did a lot of digging. I'll list some of my reference sites at the end of this post. The bottom line was that I was successful after a lot of fiddling. So how did I do it?
Configuration:
NeXTStation Turbo running NeXTStep 3.3 with a local NeXT Laser Printer
Windows XP Home PC
Both machines on a local subnet.
Host file on Windows resolves the proper name / IP for the NeXT
Steps for solution:
/usr/local/samba/lib/smb.conf:
[global]
workgroup = Workgroup
encrypt passwords = yes
guest account = archerca
log level = 4
printing = bsd
printcap = /usr/local/samba/lib/printcap
[test]
comment = testing
path = /usr/spool/samba
print command = /usr/ucb/lpr %s
read only = no
guest ok = yes
guest only = yes
printable = yes
/usr/local/samba/lib/printcap:
Local_Printer
NextStations and NextCubes (aka. black hardware) were build by NeXT ( a Steve Jobs undertaking) through 1993. These workstations were the "Cadillac" of computers in their time. Their OS, NeXTStep, eventually became the basis for OS X.
One of the nice features of these computers was the NeXT Laser Printer. The 400 DPI black and white monster I got with mine ran for 5 years without changing the toner cartridge. At my college, my colleagues and I would print out hundreds and thousands of pages out on them without so much as a glitch. I like them so much, that when I bought my NeXTStation turbo back in '93, I got the laser printer too.
Now I have Windows and Linux boxes around and a small network, and I want to resurect my old beast and see if I can use its printer with it as a print server. I did a lot of digging. I'll list some of my reference sites at the end of this post. The bottom line was that I was successful after a lot of fiddling. So how did I do it?
Configuration:
NeXTStation Turbo running NeXTStep 3.3 with a local NeXT Laser Printer
Windows XP Home PC
Both machines on a local subnet.
Host file on Windows resolves the proper name / IP for the NeXT
Steps for solution:
- Install the NeXT Laser Printer on the NeXT and make sure it works. Mine was locally named Local_Printer.
- Install samba on the NeXT. I used version samba 2.0.4 in binary form from here.
- Setup authentication. This is always the fuzzy part for me. Supposedly the guest access will work. I also had a login account on the next with the same username as my windows machine. In general, a very simple network drive share can be used for testing this portion of the process.
- Add two new files: /usr/local/lib/smb.conf and /usr/local/samba/lib/printcap (contents below)
- Add the printer from Windows using the Apple LaserWriter v23.0 (included in XP).
- Print away.
/usr/local/samba/lib/smb.conf:
[global]
workgroup = Workgroup
encrypt passwords = yes
guest account = archerca
log level = 4
printing = bsd
printcap = /usr/local/samba/lib/printcap
[test]
comment = testing
path = /usr/spool/samba
print command = /usr/ucb/lpr %s
read only = no
guest ok = yes
guest only = yes
printable = yes
/usr/local/samba/lib/printcap:
Local_Printer
Wednesday, September 06, 2006
An Introduction
This blog is simply a space for me to share some of the things I have learned, created, discovered, or invented with the rest of the world. I have a Rubik's complex -- I have to solve the puzzle. So here are a few solutions.
Don't look for any social posts here -- if you like how-to's and relevant experiences, keep on trucking.
Feel free to comment if you have questions, suggestions, additions, etc.
Don't look for any social posts here -- if you like how-to's and relevant experiences, keep on trucking.
Feel free to comment if you have questions, suggestions, additions, etc.
Subscribe to:
Comments (Atom)