
The fact that there are 'hidden windows' is enough to make me paranoid. The fact that a windows-crash can hide all of you windows is pretty annoying too. For just these reasons, you need unhider.
It lists hidden windows and allows you to unhide them.
Thursday, April 17, 2008
Friday, April 11, 2008

Finally Fixed the Disappearing USB Hard Drive
Under openSuSE 10.3 on the new server, the following fix appears to address my disappearing USB hard drive:
http://forums.suselinuxsupport.de/index.php?showtopic=61388
http://forums.suselinuxsupport.de/index.php?showtopic=61388
Thursday, April 03, 2008
Simple Monitoring
Sometimes you just need a simple monitor to verify when machines and protocols go down. Enter nefu from University of Michigan. It is a simple compiled program that generates syslog and html reports from simple pings and port tests. You can point it at a bunch of nodes on the network and give it dependencies and it magically keeps track of everything.
I like it because it gives me a report that allows me in a matter of seconds to diagnose a number of potential problems.
I like it because it gives me a report that allows me in a matter of seconds to diagnose a number of potential problems.
Monday, March 31, 2008
Upgrading the Network
For some time I have had two 10 Mbps hubs that extend my network from my router. The router is 10/100, but for many years my machines were all 10 Mbps interfaces. With the upgrades over the years, now most of the motherboards have on-board 100 Mbps and with the transfer of video, images, and music, I'd really like to get my speed up to 100 Mbps.
For $9.99 each (no rebate) I purchased three D-Link DES-1105 5-Port Unmanaged 10/100 network switches. The switches autosense speed, duplex, and uplink, so there is absolutely no configuration. No need for crossover cables, which is always a bonus.
The upgrade went flawlessly. I plugged in the switches and everything sensed and came up fine. My days of autosensing paranoia are finally over.
Easiest upgrade ever.
Sunday, March 30, 2008
Bread Pudding
I have liked bread pudding since I was a kid and so, finally, I decided to try to make it.
Here's my modified Internet Bread Pudding recipe:
6 cups of stale bread ton into pieces.
1 tsp pumpkin pie spice (didn't have plain nutmeg)
4 tsp cinammon
4 cups milk
2 large boxes of cook-n-serve Vanilla pudding
Put the bread in a large cake pan. Cover with spices and pudding. Add 4 cups of boiling milk. Mix slightly and bake on 350 for 30 minutes.
It turned out with too little pudding and too much cinnamon. Next time 3 tsp of cinnamon, 3 boxes of pudding, and 6 cups of milk, I think. I'll update this when I try it.
Thursday, March 27, 2008
New Server Requirements
So, it is time to start thinking about the new server. This post is where I am going to keep track of things to configure and install. First let's see what is on it currently:
- squid -- set up as a proxy server with a whitelist, might want to add filtering
- sarg -- a report generator for squid
- wordpress -- never really used it
- php shopping list -- I need php, but I think I want to replace this shopping list with a Java servlet
- cvs repository -- hmmm, maybe it is time to move to subversion
- nwn admin -- I definitely want to run a nwn server, since my daughters and I can play
- nwn server -- see above
- D&D Character generator -- Yeah, we need that
- Samba -- gotta have a central place to keep stuff
- Apache -- the basis for a lot of stuff
- MySQL -- basis for lots of stuff, too
- Tomcat -- A Java servlet container, aka application server
- Planet -- A feed aggregator that I haven't found a free host for
- Nefu-- A network monitor
- Wiki / Blog software -- I have free hosting options.
- Picture / Media Site -- A file server and free hosting are the best options
- DNS / DHCP / Firewall -- Other solutions already in place
- Email -- free hosting
The New Machine
I just got in my new system from cyberpowerpc and it is awesome.
Specifications:
500 Watt Power Supply
Extra Case Fan
AMD Athlon 64 X2 Dual Core Processor 4200+
2 GB of 800 MHz RAM
Sparkle 8600GT Video Card, 1GB (PCI Express)
160 GB SATA Drive
Windows XP SP 2
My old system was an AMD 3800+ with 1.5 GB RAM, and IDE Drive, and an ATI 9600SE video card. It would not run the 'Big 3' properly: Second Life, Eternal Lands, and BZFlag. The new system can run the Big 3 all at the same time while watching a YouTube video. Wow.
Wednesday, March 26, 2008
Lag, Ping Jitter, and Negative Pings
So my new machine rocks, but for some reason I start having problems with jitter in BZFlag. This is the weird jitter that makes the tanks jump around in time like a mexican jumping bean. I check my lag stats and sure enough... jitter in my ping times.
Ping time jitter is bad. Imagine that the server has a model of all the tanks and your computer has a similar model that is being synchronized to the server. If the time it takes a packet to get to your computer is some constant, then your view of the world will always be off by that offset -- some small lag.
Insert random changes in this offset and now packets arrive out of order and the tanks start stuttering like some sort of weird Star Trek time warp.
Tonight... a revelation... maybe I should check my server to see if it has the same problem, cause, well, we all know that Comcast is doing evil things to packets.
Server -- Linux -- Same Subnet -- No Jitter
Old Computer -- Windows XP -- Same Subnet -- No Jitter
New Computer -- Windows XP -- Same Subnet -- Jitter out the Wazoo
Hmmm... I switch network ports with no change. I turn NIC card offloading on and off with no change. I lower the speed -- no change.
Suddenly I notice negative ping times on my computer. This is getting really weird. I knew it -- I have discovered how to make a time warp.
A quick search of 'negative pings' turns up this page:
Negative Ping Time - Luke Jackson
And sure enough he and I have the same processor. I install the AMD patch and voila -- no more ping jitter.
Computers are just too damned quirky.
Sunday, March 16, 2008
How To Fix Disappearing USB Drives
I have a Linux server, and much to my dismay, my large USB drive for storage appears disappear after non-use in some sort of power-down mode. I tried automatically remounting the drive periodically using cron, and though that seemed to extend the time of usability, it still didn't ultimately fix the problem.
This is a big problem since the drive is home for my served music and my squid files. Whenever it disappears I lose my music server and my girls lose their whitelisted internet access.
Stage 2, which is now being tested, added a second cron job to move a file back and forth between the IDE root partition and USB drive every 5 minutes. My hope is that the periodic use will keep the drive from powering down.
Cross your fingers and we'll see how it goes.
Darn -- it stays on, but randomly gets remounted as READ-ONLY.
The next step is to try a newer version of Linux: Yes, that's right -- time to rebuild the server.
Wednesday, March 05, 2008
Linux Reviews Part 1
I have been tracking Linux since the RedHat 5 days. Periodically I switch through a few linux distros and check to make sure I have the best solution for my needs. My needs vary widely. I run linux on a 333 MHz laptop Compaq Armada 1750 in my garage. I run it on my main gaming machine (currently a AMD 3800+). I also have high end machines across the spectrum of laptops, workstations, and clusters. I run servers. I need live CDs/DVDs.
I figured it was about time that I started sharing some of this information. This is marked Part 1, because tracking Linux distros is a continuous process, and it is never finished.
So first, lets take a stab at some classes of linux.
How about we list a few criteria:
Detailed distro information can be found here at distrowatch.
Need 1: Minimal on Compaq Armada 1750 33MHz
I tried MEPIS, DSL, and ZenWalk. ZenWalk had the best overall hardware detection, application base, and customizeability in this realm of computers. Before ZenWalk, I also ran a stripped down version of SuSE with the blackbox window manager, but SuSE is really just too large to use on small machines.
With the ZenWalk configuration, I have been running the Compaq Armada in an unheated garage for months without a failure. The system is always responsive, though really I only run two main apps: GAIM to talk to my wife in the house and Firefox for researching whatever.
It will play YouTube video, but I have gotten around to recompiling the kernel with ISA support for the sound card.
Overall, I am impressed with ZenWalk.
Need 2: Old Gaming Desktop
PCLinux OS was my old gaming desktop of choice, mostly because it was quick, responsive, and dealt with video cards well. It had everything I wanted until the video card support just ran out -- not on the OS -- but for my old ATI video card.
In this case I also tried serveral distros including Ubuntu. The boottom line problem was always the video card. PCLinux OS had help that brought me the solution quickly. The other distros left me hanging.
Need 3: New Gaming Desktop
This will be a future post. I will be comparing the possibilities of OpenSuSE, Mint Linux, Ubuntu, and PC Linux for use on my new system.
Need 4: Low End Home Server
You just can't beat SuSE Linux for a fully functional server. It takes time to dig through the install process, which will soon be better with the release of SuSE 11. For now I am going to run openSuSE 10.3. With a minimal X install it is reasonaly small and responsive, but still alows easy remote access. It comes with everything, and the update system is easy to use.
Fedora is always an option to consider, but it has historically been too leading-edge for stable use. I consistently run into problems on my old Fedora install with bugs and problems. The latest is a USB disk problem. I never did get the update system to a state I liked.
Need 5: Take-Anywhere Live CD
Knoppix is king, but I choose to settle for the customizeability of Puppy Linux. I like the fact that my changes are saved back to the CD. One minor issue is that the more changes you save, the longer it takes to start up. I need to look into remastering the CD to get rid of that problem.
Don't get me wrong, I keep a couple of copies of Knoppix (CD, DVD) around just for those times I need more than just basic functionality, like for sysadmin stuff. Puppy, however, is my mobile platform for hardware du jour.
Need 6: Quick Server Distro
If you need a server in a hurry, there is nothing faster than Ubuntu. In my faster server install ever, I got a full LAMP system up in no time. The system has been stable and efficient. There aren't as many packages on the Ubuntu server, but sometimes you just don't need them.
Need 7: Full Server/Workstation/Cluster OS
openSuSE 11 Alpha 2 with KDE 4 -- KDE 4 is slick. The KDE 4 install neatly organizes things so you can find them. I uninstalled beagle with no problem. There are some glitches, especially with Yast. Firefox is up to date. Lots of good solid apps. I had problems with the video installation and couldn't up my resolution. No nano/pico. Performance seems good overall. Shutdown was fast. Bootup was quick too. Still, at the end of the day, I can't recommend jumping on board with an alpha version. Wait for the release of 11. It will be sharp, I am sure.
openSuSE 10.3 -- I have to admit that I was disappointed with the releases of SuSE 10.x. Quite frankly, there were a lot of problems with 10.1 and 10.2. 10.3 is much better. It is easier to navigate from a command-line perspective. There are a lot fewer documented issues with 10.3. It just runs.
The one drawback I have found with 10.3 is that it doesn't clone well over netcat. Next time maybe I will use the yast autoinstall system instead of cloning.
I figured it was about time that I started sharing some of this information. This is marked Part 1, because tracking Linux distros is a continuous process, and it is never finished.
So first, lets take a stab at some classes of linux.
- Minimal -- small installs for low-end processors, small hard disks, and vintage machines
- Live -- CD or DVD-based live installs that don't leave anything on the harddrive
- Gaming / Workstations / Desktop -- distros for a good user experience on modern hardware
- Clusters and Servers -- distros for taking care of business
How about we list a few criteria:
- Hardware Works -- Of course, this is only relevant for my hardware and quite frankly, anyone that has hardware that didn't work has a bad experience with any OS (i.e. Vista)
- Workable Software State -- There are certain software packages I need everywhere (pico/nano) and there are certain software packages that are required for a user (Firefox). I am only slightly annoyed if they aren't included, but if they aren't, they better be easy to install. And don't annoy me, the user, with you philisophical "I can't include this free software because" crap. I need software that works. If you don't like somebody elses license, rewrite the functionality so I don't care, give me their software, or give me a way to easily install it.
- Performance -- The last thing I want is an OS that wastes the resources I need on stuff I don't. For example, if the system has beagle desktop search, I had better be able to easily disable it.
- User Efficiency -- User efficiency is hard to measure. My expectations are that *I* can easily do the things I need to do. All it takes is a bit of a hassle in doing a simple thing and I am deeply annoyed.
- Documentation -- Ok, so if I have a question, I don't want to deal with people. I want answers on the web so I can get to them with google. This, of course, tends to draw me towards widely used distros so I can find another user with the same problem (and hopefully a solution). Thankfully, linux is standard enough in most cases that underlying problems are common across distros, but not always.
- ZenWalk -- the current distro I have on my Compaq Armada 1750 333MHz
- PCLinuxOS -- the current distro I have on my gaming machine
- SuSE/openSuSE -- my favorite server/cluster OS
- Ubuntu -- a solid distro and the basis for many other distros
- Fedora -- an OS I use on one of my servers
- Mint Linux -- an Ubuntu derivative
- DSL -- a classis small OS
- Mepis -- interesting little distro
- Puppy Linux -- unique live distro
- Knoppix -- THE classic live distro
Detailed distro information can be found here at distrowatch.
The Review
Need 1: Minimal on Compaq Armada 1750 33MHz
I tried MEPIS, DSL, and ZenWalk. ZenWalk had the best overall hardware detection, application base, and customizeability in this realm of computers. Before ZenWalk, I also ran a stripped down version of SuSE with the blackbox window manager, but SuSE is really just too large to use on small machines.
With the ZenWalk configuration, I have been running the Compaq Armada in an unheated garage for months without a failure. The system is always responsive, though really I only run two main apps: GAIM to talk to my wife in the house and Firefox for researching whatever.
It will play YouTube video, but I have gotten around to recompiling the kernel with ISA support for the sound card.
Overall, I am impressed with ZenWalk.
Need 2: Old Gaming Desktop
PCLinux OS was my old gaming desktop of choice, mostly because it was quick, responsive, and dealt with video cards well. It had everything I wanted until the video card support just ran out -- not on the OS -- but for my old ATI video card.
In this case I also tried serveral distros including Ubuntu. The boottom line problem was always the video card. PCLinux OS had help that brought me the solution quickly. The other distros left me hanging.
Need 3: New Gaming Desktop
This will be a future post. I will be comparing the possibilities of OpenSuSE, Mint Linux, Ubuntu, and PC Linux for use on my new system.
Need 4: Low End Home Server
You just can't beat SuSE Linux for a fully functional server. It takes time to dig through the install process, which will soon be better with the release of SuSE 11. For now I am going to run openSuSE 10.3. With a minimal X install it is reasonaly small and responsive, but still alows easy remote access. It comes with everything, and the update system is easy to use.
Fedora is always an option to consider, but it has historically been too leading-edge for stable use. I consistently run into problems on my old Fedora install with bugs and problems. The latest is a USB disk problem. I never did get the update system to a state I liked.
Need 5: Take-Anywhere Live CD
Knoppix is king, but I choose to settle for the customizeability of Puppy Linux. I like the fact that my changes are saved back to the CD. One minor issue is that the more changes you save, the longer it takes to start up. I need to look into remastering the CD to get rid of that problem.
Don't get me wrong, I keep a couple of copies of Knoppix (CD, DVD) around just for those times I need more than just basic functionality, like for sysadmin stuff. Puppy, however, is my mobile platform for hardware du jour.
Need 6: Quick Server Distro
If you need a server in a hurry, there is nothing faster than Ubuntu. In my faster server install ever, I got a full LAMP system up in no time. The system has been stable and efficient. There aren't as many packages on the Ubuntu server, but sometimes you just don't need them.
Need 7: Full Server/Workstation/Cluster OS
openSuSE 11 Alpha 2 with KDE 4 -- KDE 4 is slick. The KDE 4 install neatly organizes things so you can find them. I uninstalled beagle with no problem. There are some glitches, especially with Yast. Firefox is up to date. Lots of good solid apps. I had problems with the video installation and couldn't up my resolution. No nano/pico. Performance seems good overall. Shutdown was fast. Bootup was quick too. Still, at the end of the day, I can't recommend jumping on board with an alpha version. Wait for the release of 11. It will be sharp, I am sure.
openSuSE 10.3 -- I have to admit that I was disappointed with the releases of SuSE 10.x. Quite frankly, there were a lot of problems with 10.1 and 10.2. 10.3 is much better. It is easier to navigate from a command-line perspective. There are a lot fewer documented issues with 10.3. It just runs.
The one drawback I have found with 10.3 is that it doesn't clone well over netcat. Next time maybe I will use the yast autoinstall system instead of cloning.
Saturday, September 01, 2007
Drill Bit Holder

So I bought a big drill press today and to test it out I decided to make a holder for all of my drill bits. The construction is 3 foot long 2x4s stacked with a slight offset. I added a 'foot' on the back side to make the little half pyramid stable.
The hardest part of the whole project is drilling the holes. I used a test block to set up the depth and size on the drill bit. I also used a scrap piece of 2x4 to line up the holes from the side of the 2x4. A fan placed to blow the sawdust off of the drill press kept me drilling instead of always worrying about sawdust messing up the alignment.

Then I drilled holes... a lot of them... of different sizes and depths to match the bits I have.

I think the end product turned out nice.

Power Supply and Accessories for Teaching about Electricity

I followed the directions from this instructables how-to for "Convert an ATX Power Supply Into a Regular DC Power Supply". It was a good project to let me remember how to solder. Here's the final product:
To let this be a bit more useful for experiments to teach my daughters about electricity, I also built some jumper connectors and a light bulb fixture.
The jumper wires were made from leftover wires from the power supply and parts from Radio Shack:


The light bulb fixture is a low voltage patio lighting bulb wired up to a couple of nails on a wooden block.

The end result should allow my daughters and I experiment with what is a conductor and what is an insulator.
As noted in the original instructable, there are some dangerous components in this project. Repeat at your own risk.
Sunday, August 19, 2007
Geek Modified Media Cabinent
I am a geek. I have years worth of CDs and DVDs saved up that I burned myself or that I received in paper envelopes with computer hardware. Yes, much of the software is Linux distros. All in all, the stack of media with no cases has grown unwieldy, and though the containers that blanks come in work OK, I wanted something a bit more flashy.
And, oh by the way, I do have a lot of CDs and DVDs in my den that do have cases.
So I bought this media cabinet for a couple of dollars at a yard sale:

My idea is to add spindles to hang lots of stored CDs and DVDs on. This isn't good for stuff you use often, but that isn't what I want to store.
Step 1 is to cut some crossbeams to fit into the media center. I used 1x3 lumber. I cut it so it fit snugly into the cabinet. Test fitting it is always a good idea.
Step 2. I placed 2 CDs side by side on the board along the center line along the board and marked the center with a pencil.
Step 3. I drilled out 1/2 inch holes not quite all the way through and put in 1/2 inch dowel rods at a length chosen to not stick out from the media cabinet. Again I test fitted to make sure the piece fit properly. The dowels are glued in with Elmers wood glue.


Step 4. For my heft collection of CDs I wanted a lot of spindles, so I copied the design three more times. All copies were also test fitted. Oh, and everything was sanded, of course.
Step 5. I spray painted all of the holders, once assembled, gloss black so they would blend in with the media cabinet.
Step 6. After the holders were dry, I removed some of the shelves from the media cabinet and inserted the holders where I wanted them, using CDs to verify the spacing. I placed I single screw into each holder through the media center back. This was more than enough to hold them since they fit snug.


Sunday, August 12, 2007
Compound Miter Saw Bench Part 2: Legs and Assembly
In this segment, we build the legs, add the bottom shelf, and assemble the bench.
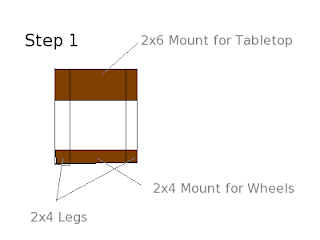
Step 1: build a square out of a 2x6 (top), 2x4 legs, and a 2x4 (bottom), as shown to the right:
Step 2: These legs then get screwed in between the front and back edge of the table top.
The back edge is identical to the front edge with an appropriate notch cut out for the saw overhang.
Here is a view of the legs attached to the table top:
Step 3: Two cross beams are attached from the bottom of each legs set to the leg set on the opposite side: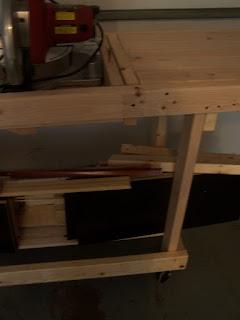

Step 4: Add wheels to the bottom of each leg. I used cast wheels covered in rubber from Harbor Freight.
I added 4 1x3s between the legs across the bottom to form a shelf for stacking wood. The additional weight on the bottom kept my rather narrow bench from being top heavy.
Don't forget to bolt your saw into the saw box per manufacturer's recommendations.
The Finished Product (with some of my short pieces of lumber stacked underneath):


Step 1: build a square out of a 2x6 (top), 2x4 legs, and a 2x4 (bottom), as shown to the right:
Step 2: These legs then get screwed in between the front and back edge of the table top.
The back edge is identical to the front edge with an appropriate notch cut out for the saw overhang.
Here is a view of the legs attached to
 the table top:
Step 3: Two cross beams are attached from the bottom of each legs set to the leg set on the opposite side:


Step 4: Add wheels to the bottom of each leg. I used cast wheels covered in rubber from Harbor Freight.
I added 4 1x3s between the legs across the bottom to form a shelf for stacking wood. The additional weight on the bottom kept my rather narrow bench from being top heavy.
Don't forget to bolt your saw into the saw box per manufacturer's recommendations.
The Finished Product (with some of my short pieces of lumber stacked underneath):


Friday, August 10, 2007
Building a Mobile Compound Miter Saw Bench
You may remember my saw. Well this spiffy compound miter saw is wonderful to work with, but really needs to be bolted down. My workbench, however, is short and doesn't have room for wood. So, the idea here is to build a workbench for my saw with wheels.

The idea is two simple stages. First, build a table top out of 2x4s to bolt the saw to. The table top shouldn't be flat, because the level surface of the saw is higher than the surface it is bolted to. Instead of having this several inch gap, I would like to have the saw table and the table top within 1/4 inch of each other, with the saw table being slightly higher. Second, the table top needs legs with wheels and a nice setup for storage. It would be nice too, if the base could eventually accommodate dust collection.
This post is going to cover stage one. Stage two: the legs will be covered in a future post.
Building the table top takes 4 major steps. There is some finishing to be done after this that will be included in mounting it to the legs after stage 2.
 Step 1, as shown above is to build 3 table segments. Just cut 2x4s to length, match them up side by side, add another 2x4 at a 90 degree angle to screw the 2x4s to, as a cross brace, and viola: a flat surface on side. I used the 4" side of the 2x4s for the table surface. It could be adapted to use the other side, if you really wanted to. Throughout this project I used 2 1/2 inch drywall screws, but a similar size screw of different types would probably work.
The result flat table segments should look like this:
TABLE TOP:
 <-- Crossbrace, with screws visible
Step 2, as shown in the diagram, is to add edges to form the saw box. This is the box that the saw will sit in and bolt to. I just literally screwed 2x4s to the appropriately sized top from step 1. As shown in the Figure of 4 steps, the edges are on top of the table top and on the opposite side from the crossbrace put on in step 1.
In Step 3, I added 2x6 edges to the table tops for the side segments. The 2x6 edge will be only slight taller (~1/2 inch) than the height of the center saw box (height = 2" side + 4 " side). Note that, per standards, 2x4s and such are not the true measurements of the wood. The 2x6 edges are screwed to the edges of the side table tops.
Step 4 is the assembly of the two side tables with the saw box. The most important part of this step is to ensure that the alignment is done so that the saw top is slightly higher than the side tables by a very small amount. Basically, I put screws from the 2x6 edges into the 2x4 sides of the saw box to hold everything together. Then I added the from edge 2x4 across the length to solidify the table. The back edge will be added during final assembly.


The idea is two simple stages. First, build a table top out of 2x4s to bolt the saw to. The table top shouldn't be flat, because the level surface of the saw is higher than the surface it is bolted to. Instead of having this several inch gap, I would like to have the saw table and the table top within 1/4 inch of each other, with the saw table being slightly higher. Second, the table top needs legs with wheels and a nice setup for storage. It would be nice too, if the base could eventually accommodate dust collection.
This post is going to cover stage one. Stage two: the legs will be covered in a future post.
Building the table top takes 4 major steps. There is some finishing to be done after this that will be included in mounting it to the legs after stage 2.
 Step 1, as shown above is to build 3 table segments. Just cut 2x4s to length, match them up side by side, add another 2x4 at a 90 degree angle to screw the 2x4s to, as a cross brace, and viola: a flat surface on side. I used the 4" side of the 2x4s for the table surface. It could be adapted to use the other side, if you really wanted to. Throughout this project I used 2 1/2 inch drywall screws, but a similar size screw of different types would probably work.
The result flat table segments should
 look like this:
TABLE TOP:
 <-- Crossbrace, with screws visible
Step 2, as shown in the diagram, is to add edges to form the saw box. This is the box that the saw will sit in and bolt to. I just literally screwed 2x4s to the appropriately sized top from step 1. As shown in the Figure of 4 steps, the edges are on top of the table top and on the opposite side from the crossbrace put on in step 1.
In Step 3, I added 2x6 edges to the table tops for the side segments. The 2x6 edge will be only slight taller (~1/2 inch) than the height of the center saw box (height = 2" side + 4 " side). Note that, per standards, 2x4s and such are not the true measurements of the wood. The 2x6 edges are screwed to the edges of the side table tops.
Step 4 is the assembly of the two side tables with the saw box. The most important part of this step is to ensure that the alignment is done so that the saw top is slightly higher than the side tables by a very small amount. Basically, I put screws from the 2x6 edges into the 2x4 sides of the saw box to hold everything together. Then I added the from edge 2x4 across the length to solidify the table. The back edge will be added during final assembly.
Side table mounted to the saw box

Another view of the saw in the sawbox with side table.

Saturday, June 23, 2007
Zenwalk Linux
Zenwalk Linux is a light but useful Linux distribution related to slackware. In recent years I have tried every distro imaginable (Mandrake, RedHat, Fedora, SuSE, DSL, etc) but the only 2 that ever seem to work well are ZenWalk and SuSE. And though SuSE is great for a great many things, it is rather bulky and not the best for performance.
Zenwalk can be downloaded here.
I had to resize my Windows XP NTFS partition to make room to install ZenWalk. To do this I used the GPartEd Live CD found here.
Installation is smooth and fast.
The hard part was getting my ATI RADEON 9600 video card to work with acceleration. I had to dig around the net to find how to get it to work. The secret ultimately was that if you install the ATI proprietary drivers and they don't work, you have to uninstall them for the default driver to work with any form of accelartion. Better yet, buy an NVIDIA video card.
The default apps were plenty. I installed Eternal Lands(my latest game addiction). I also installed samba and smb4k. smb4k also installed some kde packages. It allows me to use a GUI to browse and mount windows machines on my local network. I added openoffice too.
Fast, stable, effective. Just what every user really needs.
Next I am going to play with installing StarCraft on Wine. Yum. Or maybe I should say netpkg.
Thursday, March 08, 2007
Homemade Ravioli
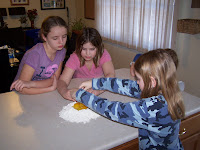
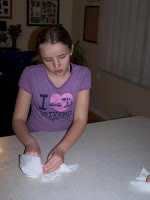
Our mission: to make homemade pasta. We decided to make ravioli, since they are large and seemed like an easy place to start. I browned some meat with Parmesan cheese and seasoning. Meanwhile we started on the pasta.
The recipe was easy: 4 eggs + 1 lb of flour. Hmmm... no scale, so we guestimated and ended up having to add 2 additional eggs to the mound of flour as we kneaded it.
The recipe was easy: 4 eggs + 1 lb of flour. Hmmm... no scale, so we guestimated and ended up having to add 2 additional eggs to the mound of flour as we kneaded it.
The Mound of flour with eggs in it.

Kneading the dough.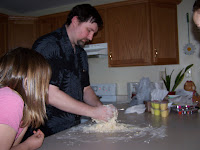
Kneading the dough.

After kneading the dough, which took around 10-15 minutes, we then rolled the dough, and rolled the dough, and rolled the dough, and rolled the dough. What I wouldn't give for a pasta maker! And the dough was still thick. Oh well... drive on...
Rolling the dough.
 Rolling the dough.
 Rolling the dough.
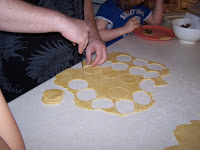
Using my biscuit-making know-how, we chose a glass to mark round ravioli halves.
Marking circular halves.
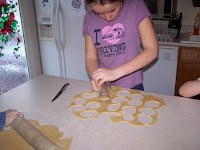
I cut the halves out with a knife. We then stuffed them full of the seasoned meat and pinched the edges shut.
Cutting out the halves.
Filling the ravioli.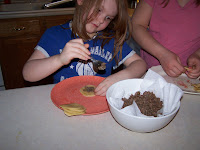
Pinching the ravioli shut.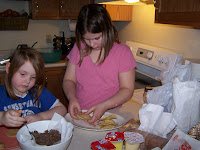
Cleaning.
Cleaning.
The finished product.

Overall, the pasta was pretty good. It tasted like regular past. It was too thick -- a pasta maker would have helped with that. The meat wasn't seasoned quite right. Overall though, it was a cool project.
Special thanks to my 4 daughters and my wonderful wife for helping with this latest family project on our Thursday creative cooking night.

Kneading the dough.

After kneading the dough, which took around 10-15 minutes, we then rolled the dough, and rolled the dough, and rolled the dough, and rolled the dough. What I wouldn't give for a pasta maker! And the dough was still thick. Oh well... drive on...
Rolling the dough.
 Rolling the dough.
 Rolling the dough.

I cut the halves out with a knife. We then stuffed them full of the seasoned meat and pinched the edges shut.

Filling the ravioli.

Pinching the ravioli shut.

Voila. Ravioli.
After getting our 24 ravioli made, I cooked them in hot boiling water until al dente. We also cleaned up the counter.

Cleaning.

The finished product.

Overall, the pasta was pretty good. It tasted like regular past. It was too thick -- a pasta maker would have helped with that. The meat wasn't seasoned quite right. Overall though, it was a cool project.
Special thanks to my 4 daughters and my wonderful wife for helping with this latest family project on our Thursday creative cooking night.
Sunday, March 04, 2007
Sump Pump Adventures

So in the corner of the new house, under a built-in cabinet is a sump pit with a old sump pump. Unfortuntately a couple of times it has stuck, though it never seems to leak any water into the house. Still, paranoia reigns supreme, and so I want to replace the pump.
Of course, just replacing it would be too easy. I want a backup pump that will run on battery power in case the A/C power goes out. This, of course, is just shy of my dream of having a full backup generator for the whole house.

So first I procured a backup pump and a new sump pump. I also bought a bunch of pipe and fittings for installation. My sump pit is about 26 1/4 " to the top of the 1 1/2" output pipe. It is about 15" across.
The diagram on the right was on the back of the backup sump pump box. Basically it shows having the two pumps connected at different levels with one-way valves. It looks easy, but that sump pit shown there is about 8 times the size of mine. This is going to be a bit of a crunch.
Installation of a sump pump requires a one-way valve on each pump. I install the one way valves on each. To save space, I run both pipes straight up, and use a U-shaped pipe to connect the backup pump to the larger pump. They also get clamped together.

A key to whole process is to cut each pipe segment straight and to use the two stage PVC glue system properly. You should glue both the inside and outside of the adjoining pipes and give them a turn per the glue directions to seal them. Cutting can be done quickly and easily using a handheld power jigsaw. Alternately, a hacksaw can be used.
The final assembly required the old sump to be cut off at the pipe.
 The new unit slipped into place and was glued. Make sure you test both pumps with water in the sump pit. Running the pumps dry can ruin them.
As of the posting of this, the unit has been in place for over 6 months without a problem.
Subscribe to:
Posts (Atom)