Monday, November 09, 2020

End Table Build

 My daughter moved into a small apartment for college after COVID eliminated the option of staying with family. We pieced together what furniture we could, but once she moved in, she found she needed an end table. Not just any end table would do, because in her small apartment, there was only a small space for one. She asked for a table 18" wide by 32" long by 17" high. It is a nice feature of build furniture -- you can build it to fit the space you have.

I searched through my scrap and found enough pine to do the job. I had cheap pine project boards from Menards that I glued up for the top and shelf. I had some old glued-together pine boards for aprons. I milled down some 2x4s to make the legs. 

The tabletops glued up but were crooked, of course. I used my small Japanese wooden plane to smooth them down and chamfer the edges. Sanding got them smooth.

I cut a slot using the table saw in the apron boards for all of the tabletop mounting hardware. The aprons I glued and then doweled for strength. 

Unfortunately, the groove I cut in the apron was in the wrong spot. To cut a new one in the aprons I bought a rabbiting bit that I could use on the glued pieces. Unfortunately, this project uncovered a pretty major issue with my router table, besides it being a pain to set up. The bit caught and changed the height of the bit. It caused me to have to cut the groove several times. Luckily, all that is hidden underneath.

I cut holes through the lower shelf for the legs, which caught screwed into place inside the apron. Unfortunately my morticing skills are still not great, so the holes were a bit off. A little molding around the legs hid the gaps. The whole piece got a couple of coats of cherry minwax stain, as requested by my daughter, and a couple of coats of wipe-on poly. 

The end products is a bit rustic, but functional. It should hold to everything short of standing on it. It was a good learning experience. It also spawned a new project -- replacing the router and lift on my router table.


Saturday, August 22, 2020

Miter Saw Bench

74 plastic shoe boxes for storage. I'm just getting started on the storage underneath.

Saturday, May 02, 2020

Homemade Sunglasses Holder


This was an easy build but useful and looks good. I sanded a rough board on the face and attached five 1/2" copper pipe strips equally spaced across the face with nails. I then polished the copper with a wire brush on a dremel. One complete, I gave the whole thing a coat of wipe on poly.

Saturday, April 25, 2020

My Carving Bench

I'm new to carving and it didn't take long to realize my traditional benches weren't going to work for my carving. They are the wrong height and the wrong scale for small carving projects. I thought back to a carved I had seen at a festival a few years ago who used a stump as a carving bench.


I still wanted mobility though, something a far cry better than dragging a stump around. I built a X using half lap joints in 4x4s and added casters. I carved a matching X in the stump I had of the right size. Assembly was quick with some long deck screws.


I quickly found I need some clamping abilities, so I added a hole for a hold down and a couple hold-down clamps. It has worked out well. Also, if I ever want to take my woodworking to outdoor festivals, it is plenty portable.


Hanging my Lathe

My two car garage is full of both my shop and other stuff, so space is always at a premium. I got a rather large lathe from my father (from what I can tell it was sold under about a dozen different names including Harbor Freight). I love the lathe, but finding a place for it can be a challenge since it is very long.

When looking up specs on the lathe to order accessories one day, I noticed it was only 50lbs. Cool. I found a hundred pound bike lift and put my plan in motion. I was going to make my lathe lift out of the way.


I knew mounting the pulleys was going to be a huge challenge. My garage shop has textured ceilings that hide the stud lines and make a stud finder useless. I knew I didn't want to be guessing on studs. Luckily I have a FlirOne IR camera. It shows the studs right through the layers and allows me to line things up. It is still a two person job, with one on the latter marking and one running the camera.


My ceiling is 24" on center so I knew I was going to need something to mount too. I grabbed a 2x10, mounted the pulleys on the lathe and the plate to match. To mount the plate to the studs I found some structural screws (a new fangled alternative to lag bolts) and got them placed into the 2/10 on 24" inch centers. These things are rated so I could hang ten of the lathes from it without moving the structural screws.

To get the plate in place, we placed 6 long screws in the studs at a distance wider than the 2x10. We then wrapped one side with wire. When it came time to mount, we lifted the 2x10 in between the screws and wrapped the wire around the screw to hold the 2x10 in place in all 3 places. This allowed me to slide the 2x10 back and forth to line the structural screws through the 2x10 up to the screws marking the studs.

I pretty much spent an entire battery putting in the 6 structural screws. They are long and tough to drive, but it gave me confidence that this 2x10 was solid. One of the screws hit something hard (I suspect a metal plate in the ceiling) so I backed that stud up with a couple more long screw through the 2x10.

We fed the rope through. With the bike mount rated for 100lbs and the lathe being half that, I figured the rope would give us no issues. It is a hard lift, but the rope held well. The lopside weight distribution of the lathe resulted in it hanging crooked, but I have plenty of space to the ceiling, so it won't bother me.

For now, I have the rope (with brake engaged) tied off on my bench. This isn't ideal, since it is in the way when the bench is in use. I will be rerarranging things so I can tie it off on my wood cart out of the way.


The lathe has been hanging for several weeks now with no sign of trouble. Nothing has moved.

Personally, my one lesson learned was that I mounted the pulleys in probably the opposite direction I planned, which makes tying off the rope a bit more of a pain. It is nice to get my bench back again.

Sunday, April 22, 2018

Harbor Freight Dust Collector Upgrade

My Christmas woodworking season got cut short this year The build up of dust, especially from my new planer, became too much for me and I had to stop work. Everything is on hold until I get a full dust collection system put in.

I have looked around and considered my options. For my two car garage sized shop that shares space with other necessities, I figured the Harbor Freight 2HP dust collector will work just fine as a starting point. I read all the advice and watched all of the rebuild videos. Ultimately, I cam to the conclusion I wanted to wall mount the whole system, add a separator stage, and add a Wynn filter.

Adding a dust collection is expensive enough without adding a lot of unneeded expense. I desided rather than to go with one of the plastic cyclone separators, I would just use a metal trash can separator. I picked up a couple of appropriate nozzles at Rockler and made a first version using just the metal trash can lid. Needless to say, it didn't work.

I then decided to bump it up a notch with a wooden Thien baffle, very similar to the one the Stumpy Nubbs version. I'll be using some toolbox style clips to hold the lid on, but based on my first tests, they are mostly to keep just from knocking the lid off. The suction holds the lid on tight.

I mounted the Harbor Freight separator in the corner where I could support it from both sides with a 2x3 frame. I had to cut out a notch for the input port. I decided to leave the plastic collection bag on the bottom since it can catch any dust I knock out of the filter and gives me an idea of how well the separator is working. I have read that this bag doesn't seal well, so I may add a rubber seal around the outside to help. Like everyone else, I find putting the bag on to be a pain, although the trick with magnets from Wood Work Web helps.

Mounting the blower and motors was the tricky part. It brackets are 90 degrees off from the ideal direction to mount it. I ended up using a plywood backer plate with a 2x6 and a 2x3 to attach the brackets to the backer plate. I also put a 2x3 along the bottom for the blower to rest on.

I messed up and didnt choose a backer plate wide enough to hit two studs in my garage, so I ended up adding a 2x4 foot against the wall under the far side to counteract any torgue from the weight.

The run from the blower output to the Harbor Freight separator case was only 8 inches, so that was very optimal. I used a clear straight-shot 4 inch hose down to my trash can separator.  The lack of twists and reduced hose lengths over the out-of-the-box Harbor Freight design certainly has to help the air flow.

I plan on running the reset of my dust collection through schedule 40 pipe (schedule 20 is not available in my area). I'll add a post on that later.

Here's the picture of the final working install. After the installation of the pipe is done, I might also cover this with insulation foam to deaden the noise a bit.


Saturday, July 25, 2015

Canvas Repair

My daughter got a damaged canvas still in the package for free from a yardsale.  It looks like the pointed end of something got jabbed into it.

To repair it, I used spackling compound made to repair holes in walls.  Add a bit, smooth it over with a little extra.  Allow it to dry.  Then sand smooth.  To get a more uniform surface, try priming the whole canvas before using it.


Friday, May 15, 2015

Fishing Pole Rack from Plywood and a 1x2

Full Fishing Pole Rack
I have 6 good fishing poles, and as I am working in my garage, I don't want them to get damaged.  I finally decided to build a fishing pole rack.  This one is my prototype for use in my garage.  Someday I might make some nicer ones as gifts.

The basic design is three circles.  The bottom of the rod rests against the bottom circle.  The middle circle has holes in it for the rod to lean inside of.  The top has slots for wooden clothespins to hold the top in place securely.

In this case, all three circles are made out of thick plywood.  The bottom two have a couple of rectangular uprights between them to set the spacing.  They are just glued in place.

The post of the center uses glue and pocket joints to hold it in place.  Unfortunately, I got a bit of a split when screwing it in place, but it is still strong enough to work in my shop and I can fix it in the next version.

To hold the clothespins in place I put a small dab of super glue on one end and covered the rest with wood glue.  The superglue will hold it in place in only a few seconds while the wood glue dries.

As an added touch, I had some small plastic casters left over from some big box piece of furniture that we never used, so I drilled holes in the bottom and forced them in.  It rolls nicely and is easy to spin to get access to all the fishing poles.


Monday, April 06, 2015

New Shelves

My youngest daughter and wife did most of the work on this.  It is a new set of shelves in my gaming room to hold miniatures.  The shelves are stained cheap pine boards and 2x4s.  They are notched to fit together square.  Very cheap (less than 25$) buy they look really nice and are very sturdy.

Friday, October 24, 2014

Restore Fire Pit

We went over to the local Habitat for Humanity Restore today where they sell donated building supplies.  There we found some leftover block for 25 cents a piece.  So for $4 we got enough block to build a small fire pit big enough to roast a few hot dogs and marshmallows.  Veronica and Sarah dug out the grass and assembled it.  Tomorrow night the girls are going to try it out.

Sunday, September 07, 2014

WOW!! How Big a Two-Car Garage Is

Today after almost 8 months at the new place with extensive help from my daughterlings, we finished the first complete sort of the garage.  Not all the shelves are up yet and I am still storing the mower and snowblower in there until we get a shed, but already there is room now to work or park a car. The prep was somewhat rushed because I need a place to park a couple of motorcycles for a few days, but it still felt good to get it done.

The work areas are divided into a large bench for hand tools and finishing where there is no power, a power tool area for woodworking, and a general area for assembly or doing repair work (lawnmowers, cars, etc).  Unfortunately bicycle storage takes up a lot of space, though I suspect that will be reduced as the girls start driving.

I have two 4x8 sheets of plywood sheets ready to go for my next couple of projects.  I plan on revamping my table saw with a bigger plywood top and a new fence.  I'm also planning to build a cabinet for my compound miter saw.  Both will be waiting for me to heal from my current back problem.  Hopefully I can get them done before winter.  I am also working on a solar heater for the garage window, which would make the shop easier to keep going in the winter.

Saturday, September 06, 2014

Reused Lumber Cart

Storing lumber takes a lot of space.  Moving lumber can be a pain, especially full sheets of plywood.  For a small investment in four casters and some screws, my daughter's built a wood storage cart under my direction out of reused lumber.  Some old wooden swingset pieces make up most of the cart.  The build used some extra wooden braces and toe screws to sturdy it.  One side is 6 feet long and open for large pieces.  The other side has bracing on the ends so it is suitable for smaller length pieces which can be sturdied with a couple of bungee cords.

Monday, April 29, 2013

Sarah's Heater Shield Project

Sarah has been studying Great Britain in social studies.  As a class project, she had to make a shield with a coat of arms on it.  She chose to make a heater shield with our family crest on it.

STEP 1:  Sarah made a ton of drawings for her shield design.

STEP 2:  She made a poster board template of the shield and taped it to the 1/4 plywood and traced out the shape.

STEP 3:  She cut out the shape on the bandsaw very carefully.

STEP 4:  She hand sanded the edges.

STEP 5:  She smoothed out the shape using a drum sander on the drill press.

STEP 6:  She made a temple for the snowflakes that represent her as the third daughter of the family.

STEP 7:  She drew out and painted the coat of arms on the board.

Here is Sarah proudly displaying her final product.


Sunday, March 31, 2013

Dice Popper Prototype

Here's my first prototype for a dice popper:


Eventually I am planning a 7 module version with a full set of polygonal dice for Pathfinder.

Bandsaw Reindeer: Rough Cut

My first attempt at a bandsaw reindeer.  This is an old 2x4 I cut down, so the quality isn't great, but it let me work on my form.


Saturday, March 30, 2013

Dollar Store Birdhouse Condo

Here's a cool project.  My daughters and I painted up some dollar store birdhouses in bright colors.  Then we mounted them to some 1/4" plywood squares (painted black) with small holes in each corner.  By choosing the right hole size, we could use twine tied with knots to hold each birdhouse in place.  We tied a rock on the bottom to keep it from tumbling in the wind.

Tying them all together was a bit of a chore, but Sarah helped me with that.


And here's the finished product:


Friday, March 29, 2013

Band Saw Project Number 1

Yeah, I've been away from this blog for a while, but I recently got a bandsaw and now projects are underway again.

This was the project I saw on a Lowes Creative Ideas email:


And this was my version:


Sunday, April 11, 2010

Tillandsia Pot

Tillandsia is an air plant that takes no soil.  It needs a place to sit but no soil.  They have to be watered like normal plants, but pull all the nutrients they needs from the water.

We keep forgetting to water them.

To get them watered I made a regular pot with a plant in the top with a drain hole that runs down by holes for the tillandsia plants.  When we water the plant on top, the tillandsia plants get watered too.


Hen and chick on top with tillandsia plants in holes in the side.


Hen and chick has rock mulch around it.


Tillandsia plants are hot glued into place in holes on the side.

New Woodworking Jig for Making Chessboards

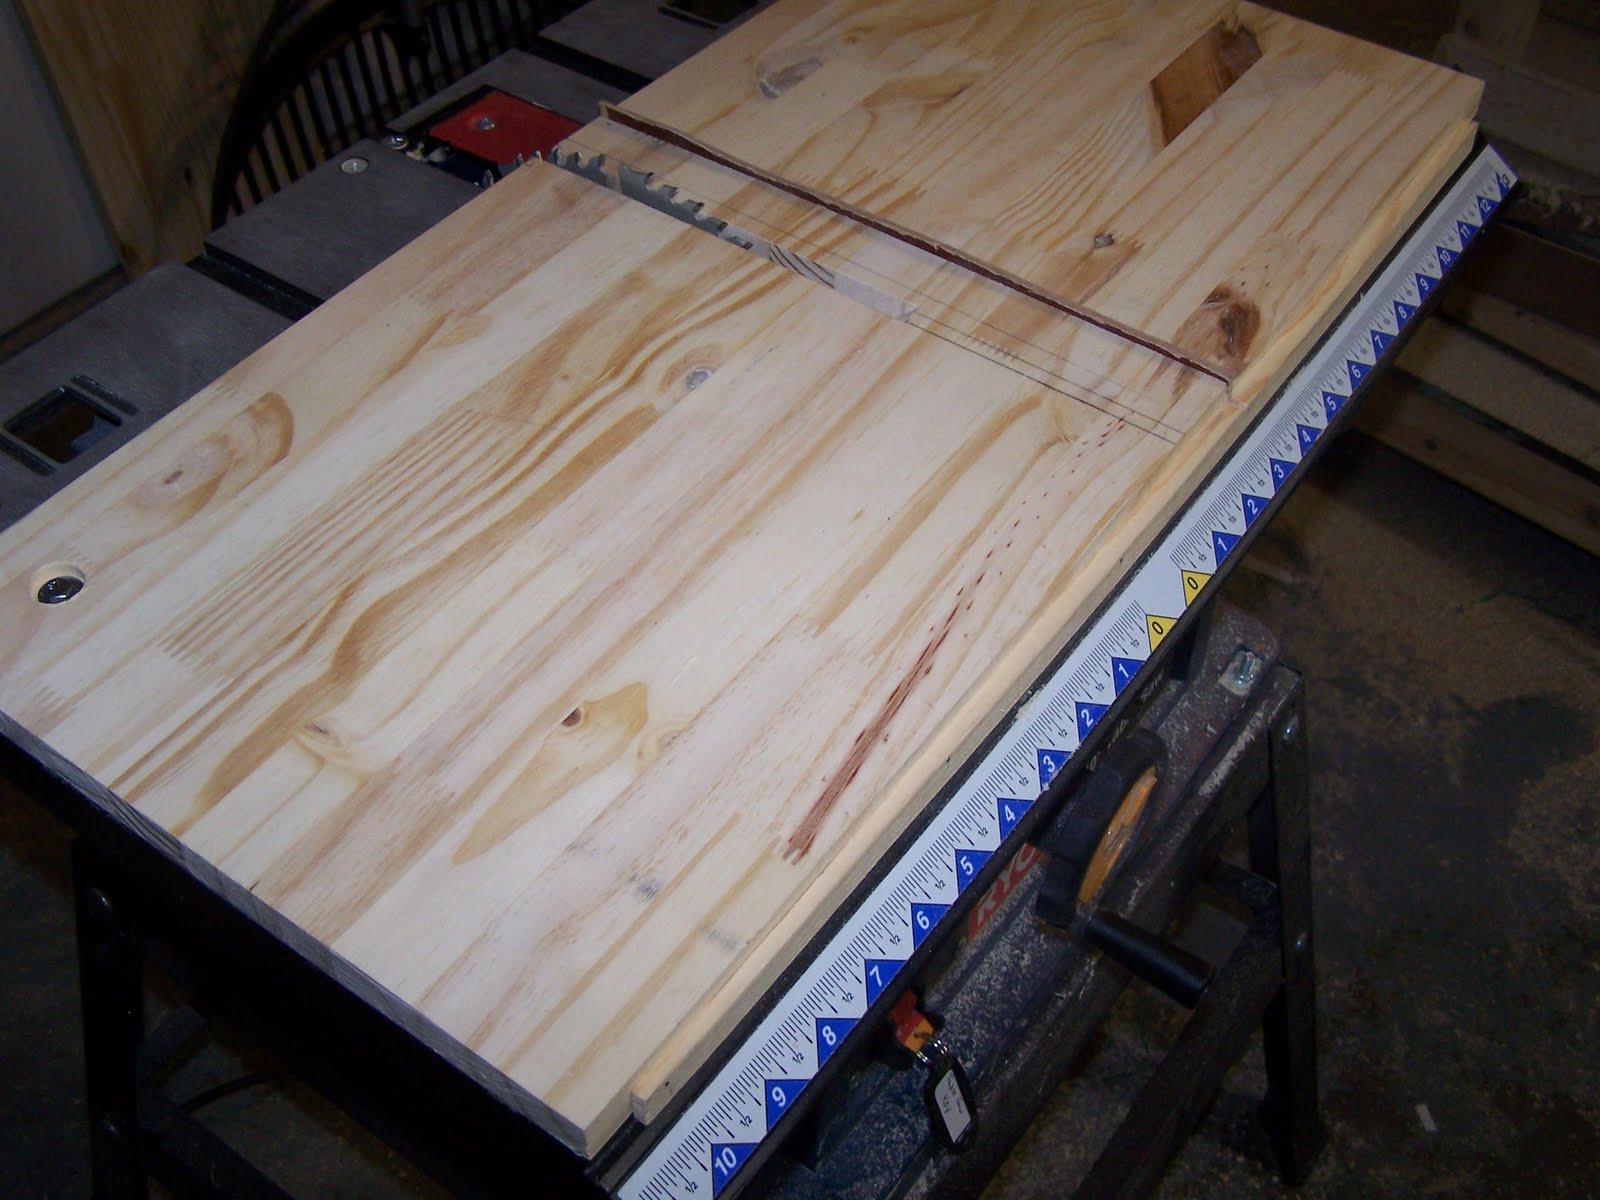
I am wanting to make some chessboards.  The boards will have slots cut with a table saw between the squares.  To do this, I needed to make a jig that can set the distance between the edge or another slot to exactly 1 1/2 inches.

The new jig fits right on my table saw.  Feet underneath fit in the miter gauge slots and a stop on the front rests up against the front edge of the table.

A thin strip of wood is inlaid into the top 1/2 inches from the blade and sticking up about 1/4 inch.


Recessed bolts hold the jig in place.


A miter gauge slot was routed in.


The slot fits tight with the miter gauge.


Thanks to my helper...


... we were able to get some nice parallel cuts with our new jig in a test piece of wood.