Sunday, April 11, 2010

Tillandsia Pot

Tillandsia is an air plant that takes no soil.  It needs a place to sit but no soil.  They have to be watered like normal plants, but pull all the nutrients they needs from the water.

We keep forgetting to water them.

To get them watered I made a regular pot with a plant in the top with a drain hole that runs down by holes for the tillandsia plants.  When we water the plant on top, the tillandsia plants get watered too.


Hen and chick on top with tillandsia plants in holes in the side.


Hen and chick has rock mulch around it.


Tillandsia plants are hot glued into place in holes on the side.

New Woodworking Jig for Making Chessboards

I am wanting to make some chessboards.  The boards will have slots cut with a table saw between the squares.  To do this, I needed to make a jig that can set the distance between the edge or another slot to exactly 1 1/2 inches.

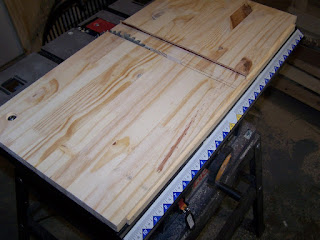
The new jig fits right on my table saw.  Feet underneath fit in the miter gauge slots and a stop on the front rests up against the front edge of the table.

A thin strip of wood is inlaid into the top 1/2 inches from the blade and sticking up about 1/4 inch.


Recessed bolts hold the jig in place.


A miter gauge slot was routed in.


The slot fits tight with the miter gauge.


Thanks to my helper...


... we were able to get some nice parallel cuts with our new jig in a test piece of wood.

Saturday, January 23, 2010

First Wood Carving


I started with an excellent tutorial here.

I have a lot to learn and it will be fun learning along the way.


Desktop Terrarium Project

This was a really inexpensive project for dressing up my desk through the dreary winter.


Collected materials:
  • Colored stones from dollar store
  • Air tight glass jar for $5 on clearance at local hobby store
  • Potting soil
  • Plants (These were perennial hen and chicks that I had to dig out from under a snow bank)
  1. Washed out the jar with water.
  2. Washed the plants with a little water since they were bare root. Left them damp.
  3. Placed stones around the outside of the jar in a colored pattern.
  4. Added a layer of potting mix.
  5. Placed more stones around the outside of the jar.
  6. Added more potting mix.
  7. Wet the potting mix until water was visible around the stones.
  8. Added plants, patted them into place.
  9. Placed the jar in a sunny spot.
Surprisingly these pictures taken a couple of weeks after planting show that the hen and chicks established nicely even though they were frozen under a snow bank. I also planned to add some irish moss, but I couldn't find it. Maybe I'll add it in spring.